树莓派之LNMP环境
树莓派系统已升级为Debian 9 Stretc。可以直接安装php7。
注:php7 需要更改源。
deb http://mirrors.aliyun.com/raspbian/raspbian/ stretch main contrib non-free
deb-src http://mirrors.aliyun.com/raspbian/raspbian/ stretch main contrib non-free参考:https://www.cyberciti.biz/faq/installing-php-7-on-debian-linux-8-jessie-wheezy-using-apt-get/
安装开始:
安装nginx。使用putty登陆系统后,先更新源sudo apt-get update,接着安装nginx sudo apt-get install nginx
配置nginx:
worker_processes 1;

worker_connections 256;

gzip on;
gzip_disable "msie6";

gzip_vary on;
gzip_proxied any;
gzip_comp_level 6;
gzip_buffers 16 8k;
gzip_http_version 1.1;
gzip_types text/plain text/css application/json application/x-javascript text/xml application/xml application/xml+rss text/javascript;
server {
listen 80 default backlog=1024;
#listen [::]:80 default_server;
root /var/www/html;
# Add index.php to the list if you are using PHP
index index.html index.htm index.php index.nginx-debian.html;
server_name _;
location ~* ^.+.(jpg|jpeg|gif|css|png|js|ico|xml)$ {
access_log off;
expires 1d;
}
location / {
# First attempt to serve request as file, then
# as directory, then fall back to displaying a 404.
try_files $uri $uri/ =404;
}
# pass PHP scripts to FastCGI server
location ~ \.php$ {
include snippets/fastcgi-php.conf;
#
# # With php-fpm (or other unix sockets):
fastcgi_pass unix:/dev/shm/php7.0-fpm.sock;
# 注意此处 sock 文件位置 要与php-fpm 的www.conf监听路径一致
# # With php-cgi (or other tcp sockets):
# fastcgi_pass 127.0.0.1:9000;
}
}重启nginx使配置生效
sudo service nginx restart安装Php7:
sudo apt-get install php7.0-fpm php7.0-cli php7.0-mcrypt php7.0-mysql php7.0-mbstring php7.0-xml php7.0-gd php7.0-curl配置php :打开php.ini配置文件,找到cgi.fix_pathinfo选项,去掉注释,然后将值设置为0
注:查找php信息
$ apt-cache search php7.0-\*
$ apt-cache search php7.0-\* | grep -i mysql
重启PHP
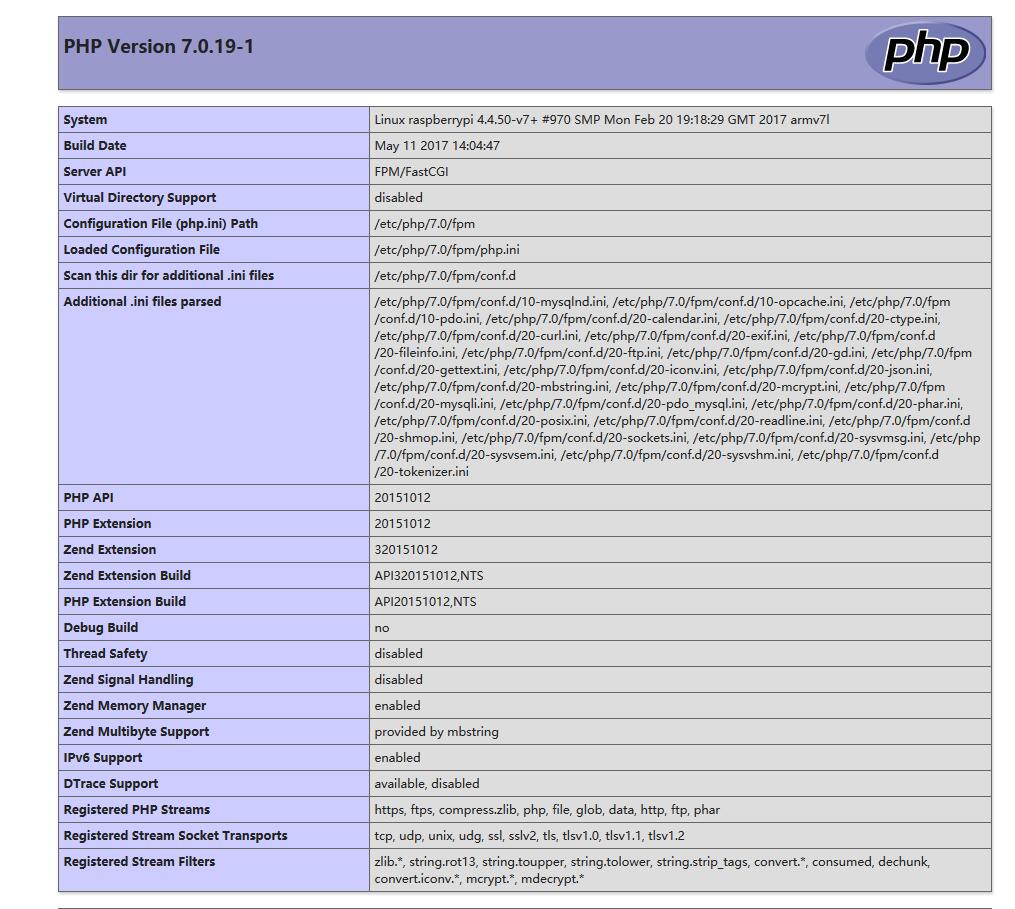
sudo service php7.0-fpm restart打印phpinfo():
安装Mariadb:
sudo apt-get install mariadb-server注:因为php7的缘故,我这里的源用的是 debian9 的,直接安装没压力。其它源可能需要其它操作,参考地址:https://downloads.mariadb.org/mariadb/repositories/#mirror=neusoft&distro=Debian&distro_release=jessie--jessie
https://linux.cn/article-8283-1.html
sudo apt-get install python-software-properties
sudo apt-key adv --recv-keys --keyserver keyserver.ubuntu.com 0xcbcb082a1bb943db
sudo add-apt-repository 'deb http://mirrors.scie.in/mariadb/repo/10.0/debian wheezy main'

sudo apt-get update
sudo apt-get install mariadb-server
然后,运行 mysql_secure_installation 脚本来保护数据库,在这儿你可以:
- 设置 root 密码(如果在上面的配置环节你没有进行设置的话)。
- 禁止远程 root 登录
- 移除测试数据库
- 移除匿名用户
- 重载权限配置

重启mariadb
sudo service mysqld restart注1:一般我会限制root只能本地登录,这时候需要再加一个外网访问权限的用户。
 #登录数据库
mysql -u root -p
#创建用户
 CREATE USER 'testuser'@'%' IDENTIFIED BY 'test.123';
 #设置权限
GRANT ALL ON *.* TO 'testuser'@'%';
 #更新权限
FLUSH PRIVILEGES;
#查看用户列表
SELECT User, Host, Password FROM mysql.user;
注2:如果连接数据库提示:Lost connection to MySQL server at ‘reading initial communication packet', system error: 0或者ERROR 2003: Can't connect to MySQL server on 'localhost' (10061)
看看是否有绑定本地回环地址的配置,如果有,注释掉下面这段文字:(在文字之前加上#号即可)
bind-address = 127.0.0.1然后找到[mysqld]部分的参数,在配置后面建立一个新行,添加下面这个参数:
skip-name-resolve保存文件并重启MySQL
添加用户命令参考:http://www.linuxidc.com/Linux/2015-03/114803.htm
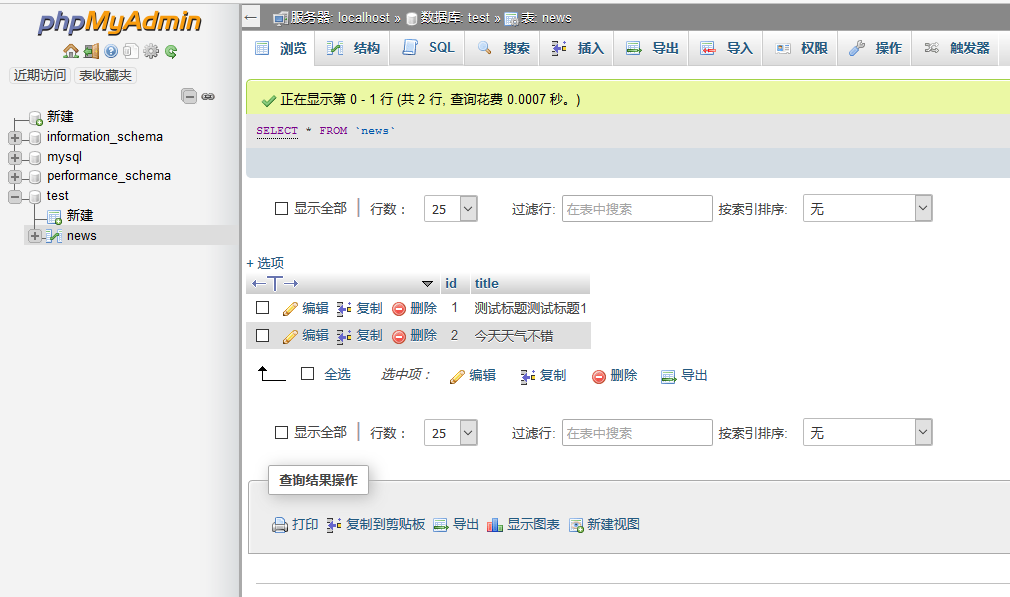
创建测试表:
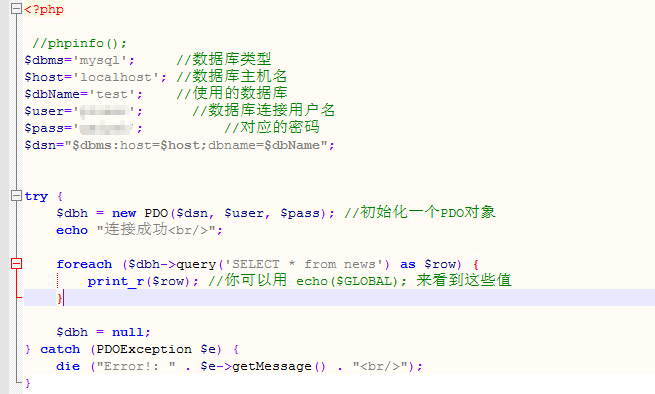
php调用数据库:

安装完成!
LNMP调优参考:http://stayrunning.blog.163.com/blog/static/19675800220132258046725/