基于redis+nginx+lua实现灰度发布
最近公司新增了一些业务,想让一些客户试用。就涉及到今天要说的灰度发布了。
这里先科普一下什么什么灰度发布。
灰度发布(又名金丝雀发布)是指在黑与白之间,能够平滑过渡的一种发布方式。在其上可以进行A/B testing,即让一部分用户继续用产品特性A,一部分用户开始用产品特性B,如果用户对B没有什么反对意见,那么逐步扩大范围,把所有用户都迁移到B上面来。灰度发布可以保证整体系统的稳定,在初始灰度的时候就可以发现、调整问题,以保证其影响度。
成熟的灰度发布方案根据实际业务场景,其实有很多。有基于api网关处理也有在服务端用nginx处理的。
今天说的就是基于nginx处理的,这方面新浪的ABTestingGateway做的很不错。
今天就简单在本地实现下,具体的流程如下图:
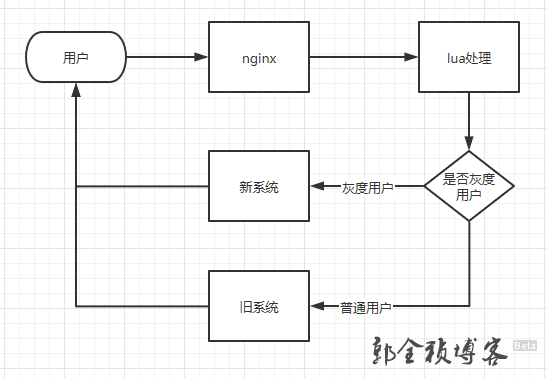
nginx接受用户请求然后转给lua脚本处理,lua脚本根据用户cookies参数从redis里取用户数据,判断是否是灰度用户,然后转发到实际的业务模块,业务模块在渲染给用户。
具体实现如下:
abtest.conf
#新系统地址
upstream new{
      server 127.0.0.1:8082;
}
#老系统地址
upstream old{
      server 127.0.0.1:8081;
}

server {
        listen        8080;
        server_name  0.0.0.0;


        location / {
              #redis lua 脚本
              content_by_lua_file redistest.lua;
              default_type 'text/html';

			  #proxy_pass http://old;

        }
		  #代理到新服务
		  location @new{

		    proxy_set_header Host $http_host;
			proxy_set_header X-Real-IP $remote_addr;
			proxy_set_header X-Forwarded-For $proxy_add_x_forwarded_for;
			proxy_set_header X-Forwarded-Proto $scheme;

			  proxy_pass http://new;
		  }
		  #代理到原来服务
		  location @old{

			proxy_set_header Host $http_host;
			proxy_set_header X-Real-IP $remote_addr;
			proxy_set_header X-Forwarded-For $proxy_add_x_forwarded_for;
			proxy_set_header X-Forwarded-Proto $scheme;

			  proxy_pass http://old;
		  }
}
test1_8081.conf
server {
        listen        8081;
        server_name  test1 0.0.0.0;
        root   "E:/myspace/abtest/testA/public";

		 # 添加几条有关安全的响应头;与 Google+ 的配置类似,详情参见文末。
    add_header X-Frame-Options "SAMEORIGIN";
    add_header X-XSS-Protection "1; mode=block";
    add_header X-Content-Type-Options "nosniff";

    index index.php index.html error/index.html;

    # 指定字符集为 UTF-8
    charset utf-8;

	# Laravel 默认重写规则;删除将导致 Laravel 路由失效且 Nginx 响应 404。
    location / {
        try_files $uri $uri/ /index.php?$query_string;
    }

    # 关闭 [/favicon.ico] 和 [/robots.txt] 的访问日志。
    # 并且即使它们不存在,也不写入错误日志。
    location = /favicon.ico { access_log off; log_not_found off; }
    location = /robots.txt  { access_log off; log_not_found off; }

        location ~ \.php(.*)$ {
			add_header Run_on old;
            fastcgi_pass   127.0.0.1:9000;
            fastcgi_index  index.php;
            fastcgi_split_path_info  ^((?U).+\.php)(/?.+)$;
            fastcgi_param  SCRIPT_FILENAME  $document_root$fastcgi_script_name;
            fastcgi_param  PATH_INFO  $fastcgi_path_info;
            fastcgi_param  PATH_TRANSLATED  $document_root$fastcgi_path_info;
            include        fastcgi_params;
        }
}
test2_8082.conf 除了端口其他的和test1一致
server {
        listen        8082;
        server_name  test1 0.0.0.0;
        root   "E:/myspace/abtest/testB/public";

		 # 添加几条有关安全的响应头;与 Google+ 的配置类似,详情参见文末。
    add_header X-Frame-Options "SAMEORIGIN";
    add_header X-XSS-Protection "1; mode=block";
    add_header X-Content-Type-Options "nosniff";

	index index.php index.html error/index.html;

	# 指定字符集为 UTF-8
    charset utf-8;

	# Laravel 默认重写规则;删除将导致 Laravel 路由失效且 Nginx 响应 404。
    location / {
        try_files $uri $uri/ /index.php?$query_string;
    }


	# 关闭 [/favicon.ico] 和 [/robots.txt] 的访问日志。
    # 并且即使它们不存在,也不写入错误日志。
    location = /favicon.ico { access_log off; log_not_found off; }
    location = /robots.txt  { access_log off; log_not_found off; }


        location ~ \.php(.*)$ {
			add_header Run_on B;
            fastcgi_pass   127.0.0.1:9000;
            fastcgi_index  index.php;
            fastcgi_split_path_info  ^((?U).+\.php)(/?.+)$;
            fastcgi_param  SCRIPT_FILENAME  $document_root$fastcgi_script_name;
            fastcgi_param  PATH_INFO  $fastcgi_path_info;
            fastcgi_param  PATH_TRANSLATED  $document_root$fastcgi_path_info;
            include        fastcgi_params;
        }
}
redistest.lua
123123mysql表:记录客户号(根据客户号作为判断标准)
CREATE TABLE `test_customer` (
  `id` int(11) NOT NULL AUTO_INCREMENT,
  `customer_code` varchar(255) DEFAULT NULL,
  PRIMARY KEY (`id`)
) ENGINE=MyISAM AUTO_INCREMENT=2 DEFAULT CHARSET=utf8mb4;
系统这里用Lumen6.3.3模拟。(这里不限其他实现)
需要配置 1.配置session使用redis驱动。 2.实现设置session操作
定义了几个路由:首页,设置session,获取session
web.php
use Illuminate\Http\Request;
$router->get('/', function () use ($router) {
    return $router->app->version()."<br> RUN TEST NEW;";
});

$router->get('/set_session', function (Request $request) use ($router) {
    $customerCode =  $request->input('customer', 'G296');
    $request->session()->put('key','{"CustomerCode":"'.$customerCode.'"}');
    return $router->app->version()."<br>set session:".$customerCode."<br> RUN TEST NEW;";
});
$router->get('/get_session', function (Request $request) use ($router) {
    $session = $request->session()->get('key');
    return $router->app->version()."<br>get session:".$session."<br> RUN TEST NEW;";
});
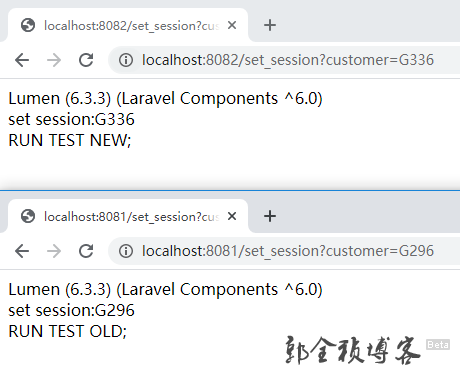
单独访问效果:
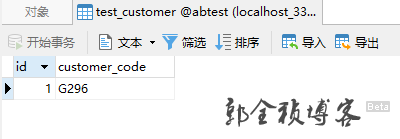
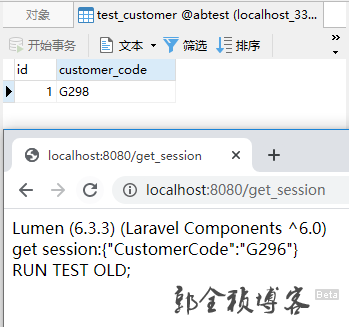
mysql设置一个灰度用户
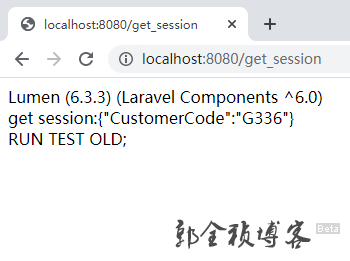
访问8080端口
数据库里设置的为G296,按照处理逻辑非G296都会走非灰度。
下面设置session把customer设置G296(模拟登录操作),然后刷新页面。
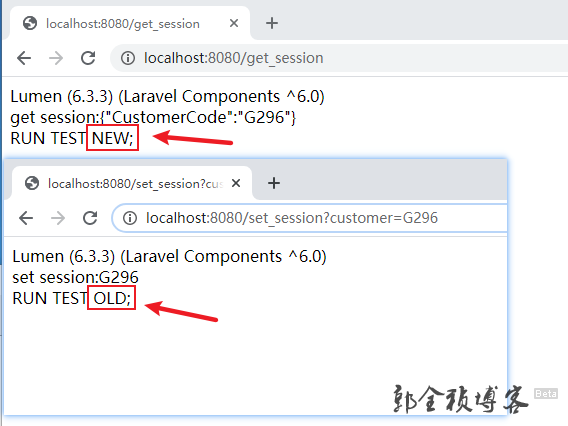
页面已经进入灰度模式了。
更改数据库值/更改session值,再刷新页面,用户就从灰度模式切换出来了。
需要注意的地方:原版的nginx不支持lua脚本,需要使用openresty
写的比较乱,能看则看,看不懂的话请下载源码
链接:https://pan.xunlei.com/s/VMPTEntlxDAhiTGNv8jdE8rkA1
提取码:pa9p